Posts

Showing posts from 2011

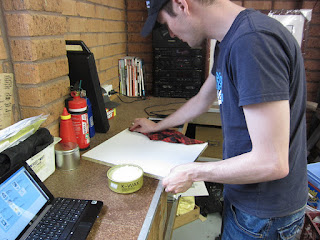
Fiberglassing a test flat sheet

Image
Here is a step through of James and me playing around with a small flat section of fiberglass. Waxing up the surface

Vote for me - On Speedhunters

Absolutely blown away that I made it onto the list - Vote for me Please!!!! Pass onto your friends to vote if you can as well Link to page, scroll down and simply mark the checkbox and click on vote. http://speedhunters.com/archive/2011/12/19/speedhunters-awards-2011-gt-gt-reader-car-of-the-year-wip.aspx Regards Matt

Craft Square vs Standard Mirrors

Image
Here is two photos showing the difference between the standard s14a power mirrors and the Craft Square ones. Std Mirrors

Craft Square Mirrors

Image
Picked up some second hand Craft Square mirrors a little while back and when i got them they needed a bit of work to make them look OK. 

Dropped off new box

Image

New Gearbox - Arrived

Image
Box arrived this afternoon and John organised to take it home with him so i could pick it up tonight, he has been great with the whole thing and here is a couple of photos below,

V8 Supercars - Pit Lane

Image
Some photos from the event, was a great race and nice company.    

COTF - Car of the Future - Up Close and Personal

Image
I was lucky enough to get up close and personal with the COTF which was on display at the Telstra 500 on the weekend. It was roped off to viewers but we were able to have a closer look and take a few happy snaps.

V8 Supercars - Armour All Show

Image
Some photos from the Armour All show  They were air brushing this chick

New Gearbox - Ordered

I bit the bullet and ordered a new gearbox through John @ Unique Autosport via Nissan Australia,

New bearing for box

Managed to track down the right bearing with a   helpful suggestion from Ben ( dinissi)  to contact award gearbox and diff in seven hills. 

Video from Phillip Island

Image

Gearbox rear housing out

Image
Stuffed back bearing

Trip back from Phillip Island - Thought things could not get worse

Image
Thought things could not get worse 

First day at Phillip Island

Image
Waiting at the gate the get into the circuit All ready for first session

Trip to Phillip Island - November 2011

Image

Replaced catch can hoses

Image
Sent from Samsung Mobile

Manifold bracing and put std manifold back on

Image

Warped manifold

Image

Phillip Island Preparation

Image
Changed the oil tonight, went with the new 

Wakefield Park Shakedown

Image
Ducked down to the HSV/SSCC drive day at Wakefield Park on Saturday to shakedown the car before i head off to Phillip Island next weekend and also check if we had fixed that pesky miss fire.

Turbo exhaust housing to dump pipe studs replaced

Image
Dropped past Unique autosport this morning and Dave drilled out and extracted the broken studs, the studs look to be normal steel studs so might be different in quality which is potentially why they bent. Drilled out ready for stud extractor

Turbo out, gasket busted, studs bent and snapped

Image
Turbo out

Miss fire - the conector

Image

Miss Fire - traced to wiring loom

It looks like the wiring loom has an issue in particular the piece that goes from the split fire amplifer to the coils.

Ignition problems

Got home last night and unloaded everything this morning. Was keen to check out what had happened so pulled out the plugs as they were brand new ones. Started pulling off the leads from the coil's and number 2 is the cause for running on 3 cyl and the miss fire, swapped over the coil and confirmed it is not the actual coil but something in the wiring, also swapped out the igniter and didn't make a difference. Pulled out the coil and
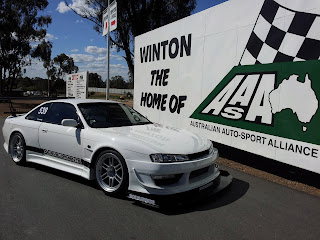
Shots from Winton

Image
 Leaving in the morning

Fucking miss fire

Seems the one higher in the rev range  has been fixed but the one on part throttle is fucking anoying the shit out of me. Have grabbed some new spark plugs. and changed the fuel filter this afternoon so hope it all runs better to tomorrow and i can have some fun on the track. Winton is a tough little track and hard to get some of the corners right, need to follow some other people around as today with the bald tires ( not kidding they delamanated in the last session) i didn' t go to bad Sent from Samsung Mobile

Getting the most out of the tyres

Image
Tried to get the most out of the tires as they are so expensive, still managed some quick times with the tires bald which was surprising.

Arrived at winton

Image
Arrived at 2:30 and left bell vista at 7:30 am with a detour via golburn to pick up Dave i t was a pretty quick trip. Sent from Samsung Mobile

Road trip - at hollbrook

Image
Just had the tie down strap snap Sent from Samsung Mobile

Ready to go

Image
Sent from Samsung Mobile

All packed and ready to go

Well nearly all packed.... Just have to throw in my clothes and bathroom stuff and then i am  off tomorrow morning. Filled up the car and have 7 jerry cans full as i borrowed two from Andrew but i think i over filled them as they are leaking. Noticed a leak from the gear box and we didn't get a chance to test the car out so fingers crossed everything works on the shakedown at winton on Friday. Feel relieve d it is finished  but also a little worried about how the car will go.  Wish me luck :-) Sent from Samsung Mobile

Splitter finished

Image

Rear diffuser manufacturer and design - part 4 - Finished

Image

Catch Can piping finished

Image

Picked up bits and pieces

Image
Strakes for the rear diffuser. Made from similar stuff as a chopping board. Carabu hook for the rear tow hook Material to stop the rubber that fills the gap between the splitter from rubbing on the front bar. Sent from Samsung Mobile

Rear diffuser manufacturer and design - part 3

Image
Playing around with the rear stakes, you kind of get the picture with the cardboard in place.

Splitter mounted to frame

Image
Lining it all up onto the frame to trace the mounting tab holes and then drill through the splitter. Drilling through the splitter

Welding mounting tabs for splitter onto frame

Image

Battery fitted in new location

Image
With the wing on the back it will take a little bit of time to get to the battery so we moved it to just behind the passenger seat down nice and low.

Fitting Catch Can

Image
Andrew welded up a mounting bracket and we fitted the catch can this afternoon after work.

New rear wheel bearing

Image
The rear passenger side bearing was badly in need of replacing so Andrew swapped it over today. 

Front splinter - low and getting lower

I really hope the spring rate we have chosen works as with the shorter springs we have   no possibility of raising the car up   further. Yes it is very low   and lets hope there are no big  bumps on the track. Special rub plates will be a must Sent from Samsung Mobile

Front Splitter

Image
I picked up the finished fiberglassed front splitter this afternoon and bought it back to Andrews workshop to get it prepared as quickly as possiable. I am running out of time to have everything done so i suspect a few late nights this week to try and get everything done. This thing is really, really light!!! When i picked it up it felt like i was holding a piece of cardboard it was that light. Surprisingly it's also really strong and i find it hard that you might get it stronger in carbon fiber so hopefully we have found the right balance with resign to matting measurements. This time we got it finished nice on both sides and it needed only a light sand before a primer coat, if i had more time i would want to high fill it all and get it super nice but i sanded it all back through a couple of grades of sandpaper and put a light coat of primer on tonight ready tomorrow to put a couple of coats of top coat on. Also Andrew is not well ATM so he is doing his best to put a smil...

Fixed up sump gasket

Image
The last workshop that worked on the car left quiet a mess on the sump pan with a pile of gasket goo everywhere. I decided to change the oil and at the same time re-do the gasket as it was a shitty job done and had developed a slight weep as the pan was not 100% flat. Not sure if they didn't think to check it when they did it or they didn't care but all sorted now. 

Rear diffuser manufacturer and design - part 2

Image
Rear diffuser progress coming along. Main sheet cut out and attached to get everything measured up, some air stakes to add and move a few things around. The exhaust needs some work to ensure it does not touch.  Here you can see the exhaust touching although we can move this around a little and potentially cut the sheet back a little more.

New 2ltr Catch Can + Sticker Pack

Image
Picked up a catch can today from MX5 mania for $75, nice and neat and cheap. Whilst i was there i picked up a CAMS sticker pack to use the tow stickers from, $15 it is easier then trying to cut them out yourself.

Front Splitter Frame - end pieces added

Image
This is the end section where a bolt will screw into to lock it all in place and enable you to put it on and off quickly and easily. Will make sense once completed.

Rear diffuser manufacturer and design

Image
First part of the design of the rear diffuser has been done. Andrew has cut it out and got it bent into shape, here we are trial fitting it and then planning on adding in stakes etc as well as mounting points. We have made it shorter to start with as the exhaust is to low in front of the diff but have made some adjustments so we are able to continue it further all the way under the car at a latter stage. Main aim with this one at the moment is to mitigate the large parachute of a rear bar i have and improve the airflow underneath.

Splitter Foam Cut

Image
Front splitter foam cut and ready for fiberglassing

Covered fiberglass inner gard with contact to protect from stone chips

Image
A couple of photos of the covering of the inside of the gard with book contact film to protect it a little more from stone chips and rubber marks. Should have done this when i got everything fitted new but at least it will help protect the fiberglass after i have repaired it all. You have to get real close to even tell it is on there so pretty happy with how it turned out. This one has not been trimed  Thus one trimmed and screws put back in, need to paint the tops of those screws....

Wheels Trial Fitted

Image

Exhaust modifications

Image

Bent suspension shaft

Image
Andrew was pulling the suspension apart to fit the springs in readiness for. the aero  and found the front left suspension was bent. I am d ropping it off to jono at heasmans tonight to fix up and hopefully won't be to expensive to fix

Wheels arrive

Image
The wheels arrived today Was an interesting conversation with the security guard trying to get them out the door though.