Posts

Showing posts from March, 2013

Rear boot(trunk) lid modified

Image
Modified the rear boot to remove weight from it, cut the inside out and removed the rear reverse lights section and replaced witha carbon piece Here is is all cut out and primered ready for paint All painted with flat black paint Rear carbon section replacing the reverse lights  

Intake brace fabrication

Image
Part way through welding on a brace for the intake pipe  Tacked it on then will weld it up off the car

Exhaust made up

Image
Visited Windsor exhaust and got them to make me up an exhaust and intake pipe, 3in stainless tig welded front pipe and mig rest with a center exit point for something different.  Muffler tucked up under

Battery mounted

Image
I mounted the battery upright but could have layed it down but prefered it this way

Battery tray

Image
Made up a battery tray  Put some extra foam in on the sides and bottom

Door skins

Image

Perspex windows and gutted doors

Image
Part way through fitting the perspex windows i picked up, i originally tried to get them off a guy in Melbourne who wanted a bit more then i could get them from PFP but he didn't seem really keen so i made some other plans and organised to get some made up locally. Ended up costing me less then getting them from PFP and they were really well mde i was very impressed, This is a shot of them just

Air temp sensor fitting

Image
Me welding in (part way through)the air temp sensor bung fitting to the intercooler piping

Boot pins fitted

Image
Cut the holes and fitted the boot pins, will be able to take some weight out from the metal backing safely and also remove the boot lock Was very fiddly work,

Side Windows made up

Image
Made these up for the side windows This is the inside so when you look from the outside it covers the white metal section around the window opening

Replaced front hubs

Image
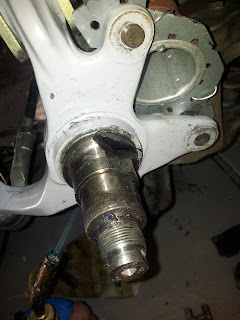
So after installing the front hubs back on a week or so ago i realised that they were stuffed and needed replacing. I picked up some second hand ones from Tim who was kind enough to also help me out with two bolts for the rear suspension i had lost as well (thanks Tim). My old front hubs had got so hot and stuffed that i had to grind, heat up and cold chisel them off to get the bearing race off. It was a massive job and

Plenum and fuel lines changed

Image
Plenum bolted back in and moved slightly the fuel filter as well as replacing the non E85 section of hose.  Nice to see things

Door skins cut out

Image
Dave helped out today and cut out the aluminium for the door skins, we have purposefully made it a bit higher so when the perspex is ready we can bend over as needed  Was thinking of cutting out the door handle and

Fuel lines routed and tank mounted

Image
Fuel lines routed and surge tank mounted  Looks nice and neat now

Doors fitted, plenum cleaned

Image
I have put the standard doors back on the car and also cleaned up the plenum  They are the standard color which is different to the white of the rest of the car so i am going to cover it with carbon vinyl as it is cheaper then painting them

New surge tank

Image
Picked up a new surge tank from a guy who makes them up in QLD and sells them on EBAY, checked the size and it's about 1.5ltrs in volume which is nice and neat. I can mount this under the rear section of the car and not have to worry about boxing up a section if i had it inside the car to meet cams specs.

Harness mounted

Image
Picked up from motorsport connections two buckles for the harness, originally the harness was run around the harness bar of the old cage but with this one James welded on a mounting plate to put a turnbuckle onto and mount the harness.

Intercooler piping

Image
New intercooler piping reducing the length to the cooler which will hopefully help with throttle responce It is pretty tight so

Oil cooler and filter mounted

Image
after mounting the oil cooler and running he lines to the oil cooler i forgot to put the filter relocation mount back on so had to trim the lines down and grab another fitting. I used the hole from the intercooler piping to run the hoses through  Used M8 rivnuts to

Fitting Guards - Duct & Lights Fouled

Image
Fitted the front bar and guards back on tonight, Had problems with stuff fouling

Wiper motor back in

Image

Mounted relay panel

Image
Finally was able to use my new rivnut tool,  Rivnut in, it is a

Modified steering column

Image
Removed the key barrel and steering lock as well as all the air bag stuff from behind where the wheel normally goes, looks a lot cleaner now and less weight.    Here is the lock and

Sway bars in

Image
Eddy dropped round and helped me out and installed the front and rear sway bars for me, did a great job and would not have got as much done as i did without his help.

Replaced injector collars

Image
Replaced the injector collars with vition o-rings as they had the standard silicone type which has started to perish. Here you can see the standard ones on the injector collars how they are pretty much gone (ignore the black silicone one by itself as this was just a test new one)  The brown one is the

Drivers side suspension back in

Image

Intercooler piping - silcone bends

Image

Modified oil and water lines

Image
I had to modify the old turbo lines to fit the Borg Warner turbo and clear the housing enough to fit

Front and rear suspension - passenger side

Image
Most of the front and rear suspension is now in on the passenger side, was a pain as lost some of the bolts and couldnt find everything i needed so spent hours looking for the right bolts and nuts. Then found that

Rear subframe and diff in

Image
Bolted in the rear subframe as well as painting the diff tonight. Used the jack to raise it and bolt back into the car.  Diff came up nice and should be easier to see any leaks that may arise

Roll cage bars to strut towers painted

Image
Painted the front section of the cage that goes to the strut towers, used a satin black finish to try and match it as close to the engine bay colour.

Oil cooler bracket

Image
Moved the oil cooler for shorter path and also because the intercooler now goes where the oil cooler piping went through.  It bolts on

Lexan Windows

Image
Making up the lexan windows

Dash fitted

Image
Fitted up the dash and cut the section for the roll cage  Going to make a

Front radiator supports

Image
Painted and back in, because of the cooler i had to trim the edges off from the top section which meant there was bear metal so i primered and painted them

Putting car back together

Image
Cleaned up some of the areas that have had oil and grease over then so that should there be any leaks in the future it is easy to spot  Dash bar going back in