Pages

Search This Blog

Saturday, September 29, 2012

Brake Ducts - Part four

So the next piece of the brake ducts it attaching the duct somewhere so it can direct cool air into the center of the brake rotor. I was lucky enough to have an old caliper mounting bracket so could use this to would out the spacing holes for the bolts.
I had some left over sheet from another job and it was thick enough to use and would be ok for the job.
Here i have cut out the shape with the

Preparing Ducts for Paint

Went a little crazy with the filler today probally way too much and over everything when i really didn't need to.

Friday, September 28, 2012

Intercooler Duct - Part One

Playing around if i will remake the front intercooler to radiator duct again. Currently is made out of light stainless sheet. Not 100% sure if i will or not yet but thought i would mold the actual front bumper duct whilst i had everything out and make a decision latter.

I framed it up with some core flute and

Wednesday, September 26, 2012

Front Brake Ducts - Part Three

With one coat of resin on they were ready to glass over the top

Oil Cooler Duct - Part Two

Here the duct is in position with the bar removed, i didn't like how it fitted against the cooler core so decided to further change the design and wrap some of the duct around the edge of the core as well as add in some mounting tabs that mount to the oil cooler core frame. The taped section below is setting up to glass over it.
Here you can see the first lot of glass on and dry with the mounting tabs on, i tried to cover up all of the tabs and then cut out the section needed to put the bolt through latter as it was too fiddly

Sunday, September 23, 2012

Oil Cooler Duct - Part One

So at the same time as doing the brake ducts and center console the other job i have been putting off for a while is ducting the oil cooler to the front bar.
This is quiet tricky as i have to get the shape of the front bar and also flow it back to the cooler so it meant i needed to take the front bar off.

Here i am masking up the section and have added a flat piece at the top which is just under the indicator, this will be the top of the duct as above this is the brake duct.
All glassed up, this was not as fiddly as the brake ducts but i still needed to be careful i didn't get

Front Brake Ducts - Part Two

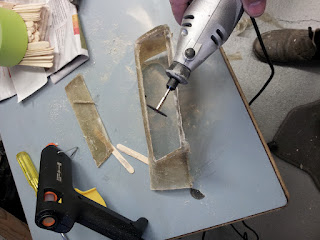
So here you can see i am cutting the back of the duct out which was fully glassed up
Hot melt gun and paddle pop sticks and i used a caulking gun silcone section just cut off the end for what the ducting will go over. Positioned it to where i wanted it and glued it down

Saturday, September 22, 2012

Fiberglass Center Surround - Two

So after glassing up to get the shape of the dash and letting it dry i pulled out the piece and added in some filler and another coat of glass. Here you can see everything ready to go and i just need to add in the catalyst
All glassed up with the filler foam in and another layer or two of glass on top.

Front Brake Ducts - Part One


So i got a bit motivated today and wanted to get some jobs i had been planning for donkeys actually started and maybe done. First off the ranks was fixing the cooling issue to the brakes. With the front splitter i think that the front brakes are getting far less air then what they used too and the front rotors seem to get more cracks in them, i think also going quicker is some of the issue but never the less i needed to sort it out.
I wanted to make something neat and that fits into the vertex ridge kit which meant buying something off the shelf was not going to work so i decided to make it up myself.


Here i am taping up the section i am about to fiberglass, i also waxed the tape just to be sure and spent a lot of time sealing all the edges etc so i didn't get too many leaks from the resin.

Saturday, September 15, 2012

Fiberglass center surround - One

I have had a piece of aluminium covered with black vinyl wrap for some time and it isn't the nicest looking piece. I originally intended to modify the factory surround but somewhere along the line i lost it and the aluminium has been in it's place.

This morning i started to fiberglass the surround and build up the thickness so i can eventually high fill and cover with carbon vinyl wrap. Hope it will all turn out OK as this is my first time playing with fiberglass

New sway bar mounts fitted

Fitted the new sway bar mounts today
 I can't put the locking rings on as

Thursday, September 13, 2012

Front sway bar mount bushings - need replacing

the front sway bars have been in the car for a fair few years now and i thought it might be a good idea to have a close inspection of them to see if they were OK and then maybe grease them up again.
Upon closer inspection it seems that have flogged out and are in need of replacing, you can see the cracks in them which is not good.

Fitting Sway bar lateral locking rings

Fitted the whiteline sway bar lateral locking rings after noticing that my sway bars were moving around too much and fouling the links.
Rear Links

Heli-Coil Thread - fixing rear sway bar mount

Drilling out the thread that was stuffed.
 Nice and cleanly drilled out

Wednesday, September 5, 2012

Heli-Coil Kit

Picked up a heli-coil kit from E-Bay, decided to purchase a kit with a few different sizes as it was not much more and you got a lot of different pieces in it.
Now to fix up the sway bar mount.

Monday, September 3, 2012

Sway Bar Mount - Bolt missing

So un-be know to me, whilst at wakefield it seems that the rear sway bar mount bolt had fallen out.....

Trying another bolt i found the thread was too far gone and i need to heli-coil it to fix it up.