Installing A Blitz LM Spec Intercooler
On My Nissan 200sx S14a
Step 1
What U Need
Hole Saw For Metal Cutting with Blade of 86mm
Power Drill
Set of Car Stands and trolley jack
Socket Set and Spanner Set
Screwdriver Set


Oil For Cutting Blade - I just used WD40
Stanley Knife, Hacksaw Blade and Preferably a Cutting Tool Like A Dremel Drill
Oddessy 800 Battery or Similar Size
Extra Power Cable and O terminal for extending positive to fuse box
BOV if u don't already have one
At Least 6 hours of your time
Step 2
Place your car on a flat service and then chock back wheels
Jack up car with trolley jack, jack up from front cross members then put your stands either side on the rails
Lay out all the Intercooler parts and make sure u keep the cooler in a safe place so as not to damage the fins on it
Disconnect the battery
Step 3
First thing u have to do is to remove the front bumper to do this u will need to remove the front head lights and side parking lights. This is because there is 3 nuts in either side holding the front bar on and u can't take it off without removing these.
To Take off headlamps first remove plastic body part in between the two lamps, the four screw on it are the type that u twist then pull on the plastic to get it off. Now u have access to the bolts for the lights. Looking at the drivers side light remove the two nuts on the right hand side of the light, then remove the screw on the top left hand side of the light, this screw will allow u to remove the parking lights, after u do this u need to pop out the parking lights with a screw driver or something, they are held on by a plug thing that just pops out when u put a little pressure on it. After u take out the parking light u now have access to the two nuts that hold in the headlamp, remove these then disconnect the 1 wire at the back and u can take these out and place them somewhere out of the road. Do this to the other head lamp as well.
OK u got the light out of the road and u can see the bolts u need to remove 6 in total on top of the bar, Remove these then start from the driver side and remove the plastic front inner guard, these are held on by screws and also by small back pins that break very easily as I have found out. Then remove the three bolts in the guard that secure the front bar. Do the same to the passengers side.
Now the bar will come off and be careful not to scratch the paint work when pulling it out. Place front bar on grass or some cloth to stop from scratching it.
Step 4
Next remove the Front Bar Support, Do this by removing the two screws on either end then removing the 4 screws near the radiator, pull this support of and place out of the way.
Step 5
Now remove the factory intercooler, the best way to do this is to remove the hole thing including all the brackets etc. and pull it out like that as u have to remove the brackets afterwards anyway. Start by removing the nuts supporting the intercooler piping, then remove the ones on the brackets. This way u can pull the cooler out then the piping later.
Step 6
Remove the factory air box and air flow meter. This give u more room to pull out the factory piping and install the new stuff.
Step 7
Remove the washer bottle. This needs to come off but don't worry as u put it back on minus the bottom bracket as this gets in the road of the piping.
To do this remove the screws securing it to the chassis, then remove the bracket on the bottom right hand side
Step 8
OK now we finally get to put on the good stuff. Start by getting the brackets for the cooler and also the new bolts. Fit the bottom ones loosely then mount cooler onto them. Then put on the top bracket and Push cooler towards car and then tighten bolts. This makes sure that the cooler is as far back as it can go so u don't have to cut as much out of the front bar.
Step 9
Next start to remove the factory piping. Start on the passenger side removing the stock piping to the cooler, u will need part of this section as the new piping will join up to this. Then remove the piping from the throttle body to the intercooler, u won't need this anymore.
Now remove the stock battery and measure up for the hole to be cut in the battery tray. The picture below shows u were but its 100mm from back of car and 100mm in from passenger side. Be careful to get this right as if u don't the piping will not fit correctly or will rest up against the meal on the battery tray and cause you dramas (Trust me I know)
Step 10
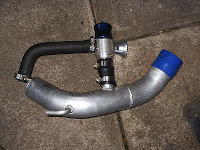
Now that you have cut the hole for the piping u can start to assemble the pipe work. The pipes are all labeled and starting form 1 on the passenger side of the car connect the new piping to the factory piping. There is a reducer hose that will connect the two pipes but make sure u put the clamps over the pipe first. Connect this up then connect it to the new cooler. Then start from the driver side. First trial fit pipe and BOV. Once u have got this right so as the BOV will not foul anything then connect up all the hoses. U will have to start from the cooler outlet then work your way up to the throttle body. Connect up the hose to the BOV then connect up the factory hose to the intercooler piping near the throttle body. Next screw in the angle piece on the passenger side of the piping and fit the hose that comes with the kit. After you have got everything to fit correctly then tighten up all the clamps starting from the throttle body and working yourself around to the stock piping on the passenger side.
Step 12
Battery Install.
The battery is pretty straight forward but u will have to extend the positive lead that comes off the fuse box. Just purchase some good cable and an O terminal and replace it. U may have to make up your own battery holder which is not to hard but if u have trouble any shop will be able to knock u up one easily. Trial fit the cables but don't connect up until u have finished everything on the install.
Step 13
Trimming the front bar to fit.
Now I do not have any photos of this in progress as it was getting pretty dark by the time I finished it so u will just have to wing it.
The best thing to do is to take a little off at a time and keep trial fitting it back onto the car. Pretty soon you will have the bar fitting snugly and will look at treat, mainly because you have a big arse cooler showing threw the front of it but also because u have the satisfaction of knowing that u did it yourself.
Step 14
Refitting the front bar
First install the washer bottle then the front bar, then install the inner guards then the main head lamps, side parking lamps and finally the center plastic piece.


No comments:
Post a Comment