Pages

Search This Blog

Monday, November 18, 2013

Crank and Cam Trigger Set up - Hall Effect Sensors

I purchased two Hall Effect sensors to run a crank and cam trigger set up. I was originally going to go with the Nigel Petrie designed one however looking at them at WTA and trying to get some help from Nigel i am not convinced in the crank triggers design.

It looks likely there is too much opportunity for vibration in the design and looking around i was much more impressed with the Ross Tuffbond set up

Nigel Petrie designed
 Ross Tuffbond
I think i might go with the Ross one along with a Ross balancer

Sunday, November 10, 2013

Coil Pack Loom

Re doing the coil pack loom with new connectors.
I was thinking of replacing the coils with LS coils or a CDI system but I might have to leave it for a while.

Wednesday, November 6, 2013

Battery Isolation Switch

The 6point manual switch is not working after checking it with the multi meter.  This could be from an interior quality product but I am not sure.
If you have a look on demon tweaks you can pick up electrical cut out switches but they are not cheap. One in particular is also used on Porsche Cup cars and a lot of EV vehicles, on demon tweaks the brand is Brise and the model ev200 but this is actually made by Tyco and funally enough is a similar part number.
I ordered one of the tyco ones tonight so hopefully will be a lot better and I can wire up cut out switches outside as well.
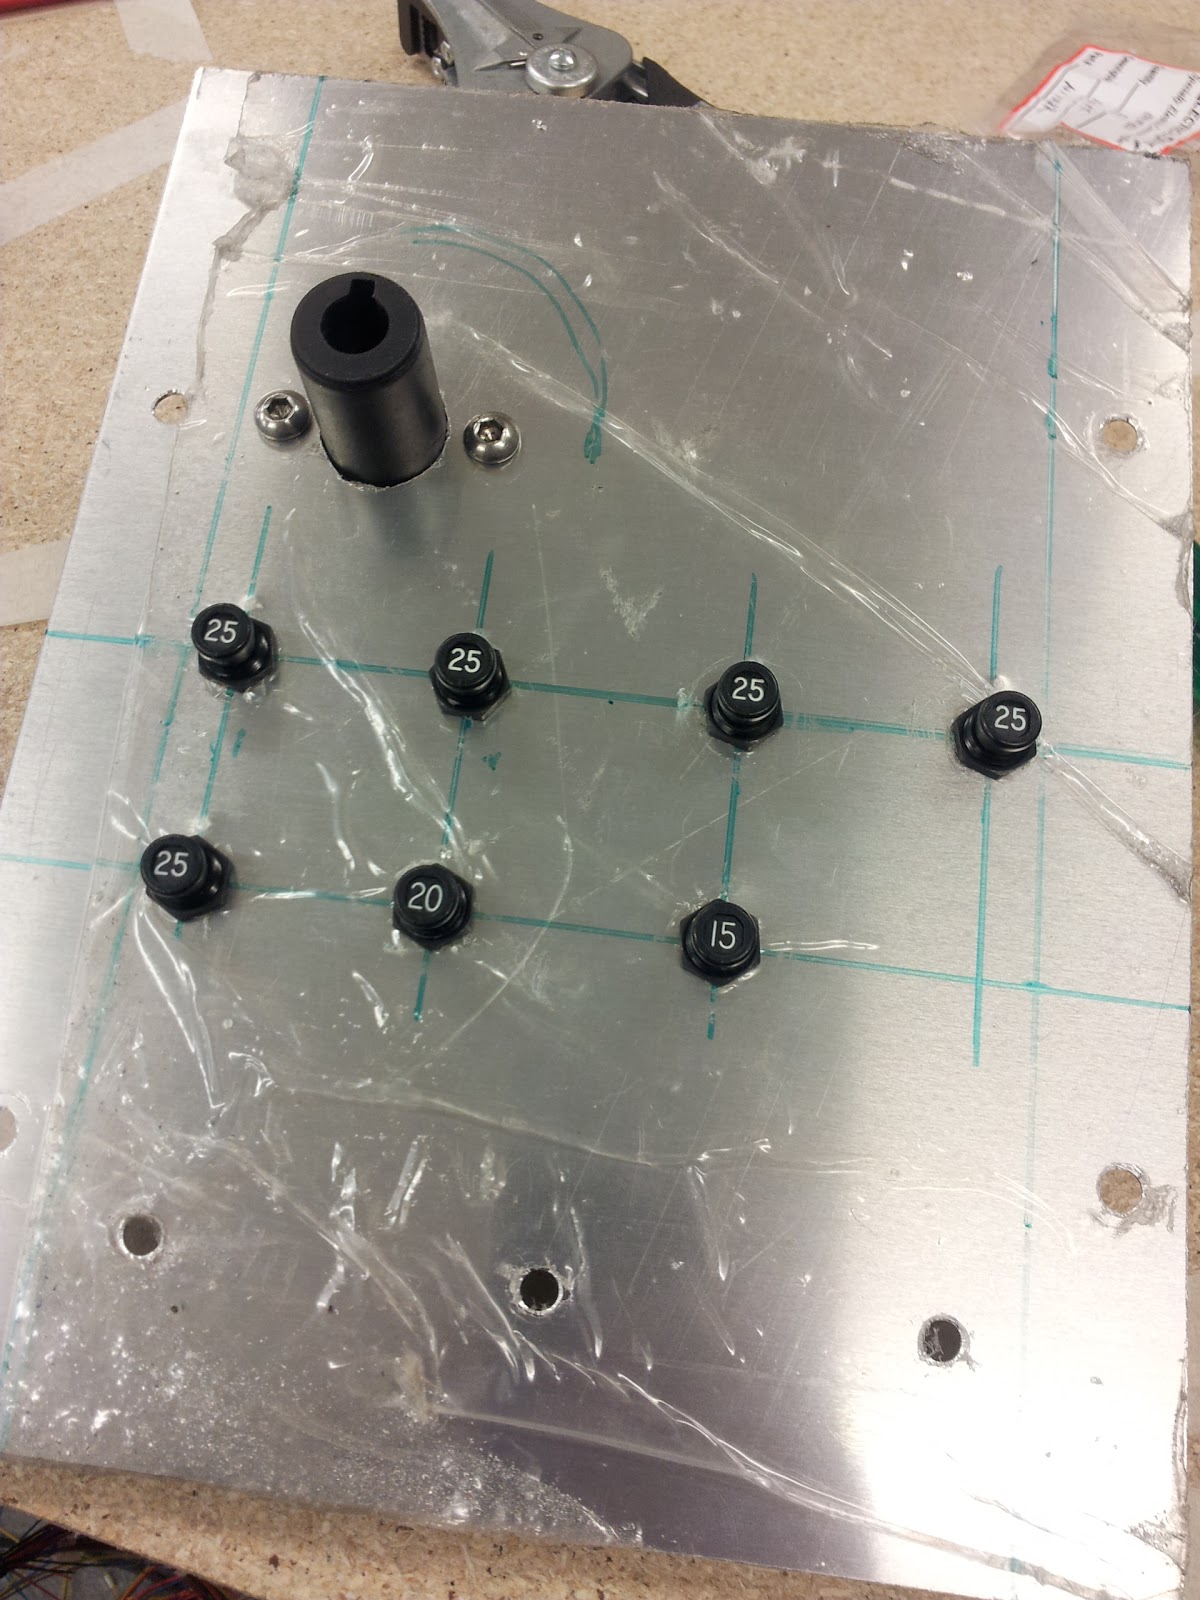
Saturday, October 19, 2013

Monday, October 14, 2013

Re-Wire, Re-Started - Resistor Board for Sensors

For the DL1 and most ECU's you need to run resistors on most temp sensor power wires so that they can read the voltage well enough. With ECU's they have this in the ECU but with the DL1 you need to run resistors on each sensor at some point.

Previously i had resistors wired the resistors into each of the plugs near the sensors and run three wires to the plug and then two into the sensor with the resistor going onto the 5v power wire.

What i have noticed is that over time these resistors can break at the plug and i never really liked this way because if the resistor breaks the readings on the logger and dash go haywire for all sensors.

Now i can run the sensors into the ECU and run a Can to Serial cable out to the dash/DL1 but you can only have a certain number of sensors and these are fixed. The other option is using up the outputs from the ECU but then it limits you with what you want to do. The new DL1 and Dash 2 are actually CAN so this is a lot better if you are buying the new models and the dash is also able to change how it displays.

What i have done this time though is create a little board and soldiered the resistors and wires to the board, this can run close to the DL1 and not be affected by vibration or every time you pull the plug on and off.

Here is a shot of the little board i made up for the DL1

Red wire is the 5v wire coming from the DL1 and the other colors are for each of the different sensors.
This also means i cut down on running 3 wires all the way to each sensor (or those that only need 2)
Only issue is i had already run the wires so i will have wasted some wire but i think this is a lot better way of doing it.

Re-Wire, Re-Started - ECU Connector

I have replaced all of the pins into the ECU connector plug and using the 22 awg mill spec wire along with the Mil spec shielded wire.
I have labeled each wire and also noted down each pin location for any fault finding latter on.


Saturday, October 5, 2013

Re-Wire, Re-Started - Center Console

Wiring up the power to each of the circuit breakers, here is a daisy chain i made up to go into the relays
 Starting to pull together the

Wednesday, September 18, 2013

Sunday, September 15, 2013

Re-Wire, Re-Started - Circuit Breakers, Tape and Motorsport Heatshrink

Picked up the heatshrink, circuit breakers and tape today
Up close of the circuit breaker, these thinks are

Saturday, September 14, 2013

Re-Wire, Re-Started - Center Console - Laying out the Breakers

Started laying out the center console piece and mounting all the breakers and switches today. 
 I was going to run a buss bar across the power section of the breakers but i was worried about it shorting out so i made up wires between the breakers.


Tuesday, September 10, 2013

Re-Wire, Re-Started - Center Console

Here is some more progress of the center console as i am playing around with how i want it to work. I was thinking of cutting the sides off the dash but now thinking i will leave them, need to fit all the circuit breakers, isolation switch, relays and switches on the panel and in behind so want to make sure i get all this right.
I might have to make up some connectors so you can pull the panel out easily if needed but this will add a lot of cost so still undecided and it is driving me insane


Re-Wire, Re-Started - Heat Shrink

So running through a few prices i originally wanted to go with the Raychem DR-25 but even though i can get it in smaller qtys i just could not justify the price.

Here is a breakdown of the pricing if you wanted

Raychem DR-25
1/4 - $4.60+ per mtr (100mtr spool)
1/2 - $5.40+ per mtr (60mtr spool)
1" - $12.85+ per mtr (30mtr spool)

I got some prices from another place in 5mtr lengths at about double the prices above
eg - 1/4 - $9.20+per mtr (Multiples of 5 mtr lengths only)

Another thought was a product that meets the same specs as the Raychem called Raceline 150
Raceline 150 (American Brand)

1/4 - $4.75+ per mtr (50mtr spool)
1/2 - $7.55+ per mtr (50mtr spool)
1" - $14.45+ per mtr (30mtr spool)

Finally i settled on the HellermannTyton SE28 which is the same Mil Specs as the Raychem Dr-25 and similar prices but i can get it by the mtr.

Here is what i have worked out i needed with a fair bit of margin for error.


Re-Wire, Re-Started - Circuit Breakers

Working out the number of Circuit breakers i want and have come up with the following

Amps
100amp Circuit Breaker100
Fan25
Lights Front25
Ignition25
Fuel Pump25
ECU & DL115
Wiper25
Parker Lights, Brake & Rear Lights20

Pretty sure i have got the amps right in total with the fuel pump very close and i would have preferred to go with a 30amp one
Going with the Klixon 2TC ones


Sunday, September 8, 2013

Re-Wire, Re-Started - Center Console

I didn't get much work done this weekend on the car with a fair few other things on but last this afternoon i wanted to at least get the center console started as i needed it to work out where everything will mount to.

I am thinking about the top section so i just cut it roughly so i could get the sides made up. The sides bolt to the standard dash bar and the front panel just has 4 screws to remove. This will make it relay easy to work on and get easy access too.

I want to put the start switch and battery isolation switch on this panel along with the circuit breakers. I am toying with the idea of mounting the relays on the side of the console but it would mean i have to cut the bottom half of the dash. 

I am not sure about this so let me know your thoughts ( would angle them the other way with where my finger is being more towards the gear stick then the top)

 I would basically cut off the bottom section here.

Saturday, September 7, 2013

Re-Wire, Re-Started - Nissan & Other Connectors

All the Nissan connectors for the engine arrived. I bought an entire kit as i wanted to start fresh rather then potentially having issues carry on from before.
I also picked up some other supplies this time

Sunday, September 1, 2013

Re-Wire, Re-Started - Measuring twice

So today I tackled the getting the engine loom length right and bundling it together.
Here it is ready to check the length and the junctions are right

You can see how small and light

Sunday, August 25, 2013

Re-Wire, Re-Started - Battery Isolation

Not sure if you have seen these before?
Brise EV200 Battery Isolator

Available on Demon Tweaks. They look like a nice clean option although for a battery isolation kit that you can have two remote push button switches to cut the power rather then the normal 6 pole FIA red switch and remote cable.

I was thinking of buying one but the price is a fair bit!!!

So after some late night research i worked out that these are actually a TE product that has has the name changed to Brise.
The part number for the Tyco Product is Kilovac EV200 Series - EV200hAANA


Re-Wire, Re-Started - Circuit Breakers

I didn't know this but there are two types of Circuit Breakers

Thermal & Magnetic

Thermal
    •Typically less expensive.
    •Trip point varies with the ambient temperature.

Magnetic
   •Typically more expensive.
    •Temperature stable over a wide range.
    •Available with different time delays before tripping.
    •One- through four-pole models.

Here is a Tyco W57 series one, Tyco seems to have reasonable quality Thermal ones although this one is not temperature compensated.

You can get the temperature compensated ones which seem to be the best overall as the normal ones are designed to work within certain temps and like the Tyco and have a lower vibration resistance. They specify as the temp rises the different cut out rates

A brand that is really good are the Klixon and suited to what is needed is the 2TC range. 

It has some nice features like
• Miniature size
• Light weight
• Trip free
• Mil-quali cation
• Current rating 1-35 amperes
• Coordinated ratings
• High vibration resistance
• High interrupt capacity


Another brand is E-T-A and Type: 412 goes up to 25amp


Wednesday, August 21, 2013

Re-Wire, Re-Started - The Tools - Mil Spec Wire Stripper


As i mentioned in when i was showing the Mil Spec wire in an earlier post, you really need proper tools to strip the wires with. The coating is so thin and so strong it is next to impossible to strip with a pair of normal pliers without doing damage especially the smaller wire gauge stuff. You can use a razor blade but it is tedious and also you cant do it without removing a few strands or wire or nicking a strand or two potentially weakening the crimp joints you may be using.

Preparing Wire & Cable.pdf

The only way to strip them seems to be with the proper tools and doing a bit of research i keep coming up with an American company called

Re-Wire, Re-Started - The Tools - Clearly Identifying Things


Some more shinny stuff arrived in the mail today that i will need for the job.

One piece i am worried about is being able to clearly identify each wire. The mess i had before was really hard to work out where everything went because it was thrown together without too much care so if i was going to do it myself i wanted to make sure i didn't repeat others mistakes.

I found whilst different colors helps i wanted to put some

Monday, August 19, 2013

Re-Wire, Re-Started - The Wire - MIL Spec Wire Arrived

The wire I ordered arrived today. Cost wise it was actually a similar price to what I paid for the normal electrical wire but the extra cost will come in the tools needed to strip the wire.

 You can use a

Sunday, August 11, 2013

Re-Wire, Re-Started - Research - Pictures of Connectors

Trying to work out all the connectors for the engine loom so i can purchase new ones.
Here is photos if anyone wants them
Here is the rest

Thursday, July 11, 2013

Car @ Unique Trying To Get Started

After nearly 5 months of waiting whilst having someone come around for a few hours here and there when they were not busy i was left with a "finished" wiring job. I took the car to Unique Automotive and Dave to try and get it started.

Turns out it's stuffed and there is a myriad of issues with the wiring. Advice from Dave and John is to start over again which is really disappointing.


Saturday, July 6, 2013

Bell Helmet

When the time comes to get back onto the track, I am a bit worried about safety so will pick up a new helmet and Hans device. I really like this one.

Sunday, May 26, 2013

Lap Weld - Aluminium

My practice at a lap weld, i ran out of filler rod and in hind sight i should have grabbed a new rod before starting. It was hard controlling the heat and stopping the thin pieces of aluminium from warping.
 I cut it down to see the penetration which was nice. There was even heat along the weld as well so pretty happy with it all

3m Carbon Vinyl Install - Rear quarter windows

 
 Installed some carbon vinyl over my rear quarter windows i had made up our of perspex. I had painted them and they looked nice but they scratched really easy as they were perspex and not acyclic.
 

Saturday, May 25, 2013

Sensor Values Reading Incorectly - Fixed

Tonight i finally worked out what was causing some of the readings on the dash from the sensors that are on the front loom to not read correctly. These were pretty important sensors like Oil Pressure and Oil temp.
After fixing the resistor issue i worked out tonight that i had the wires going into the back of the DL1 on the wrong side.
A picture explains it better but i had the first yellow wire on the right which is A2 actually in the A1 position (it is correct in this pic). Every wire was on the wrong side.....
I had basically probed everything back with my multi meter and could see all the sensors were getting power and confirmed that they were wired up correctly but when i was checking the small loom between where it comes out from the dash and into the DL1 i was getting conflicting values and it didn't seem right so i pulled out all the wires from this section and started over again.
This is when i worked out the issue.

Every sensor works with the exception of the diff temp sensor now but it is a separate loom and i can look at it another time.

Avoid scratching cage - Safety Tape

Picked up some nice stuff that i have put over the roll cage bars as you get in and out of the car where you scratch them.
Looks really neat, smart and has a textured finish.
 

Sunday, April 28, 2013

Sensors - Wrong Resistors Used

I had wired up the sensors but used 330ohm resistors rather then 1Kohm resistors, now having to go back through all the sensors and fix them up. The reason i made the mistake was I had the 330ohm ones in my tool box and just assumed they were the right ones but after i completed everything and the values on the sensors were not right i tracked it down with my multimeter and realised what i had done. Big PITA....
Here is the resistor on the wire ready to attach the sensor, i have to

Saturday, April 27, 2013

Tyre Covers

I picked these up a while ago and forgot to put them on the tyres, after moving some stuff around in the shed i realised i hadn't used them so fitted them up to my spare tyres.

Easy to use and

Sunday, April 21, 2013

Scratched the roll cage

Fitting the dash back in i got frustrated and pushed it in without having it in the right spot. The metal from the edge of the dash (have not removed it) scratched all the way down.

Sunday, April 7, 2013

Speed sensor wired up

This is from the back of the std dash and wired up so we can get a speed signal from the R33 gearbox to the dash and ecu.

Saturday, April 6, 2013

Headlight switch plus wiring loom for DL1


Here is the switch i made up for the headlights, fits where the std dash mounted dimmer switch went and looks nice and neat.
 
Loom for the DL1 i made, heat

Monday, April 1, 2013

Intercooler piping finished


Catch can breather

Don't have to worry about emissions now so rather then plump the catch can back into the intake i have just blocked it off and put a breather on the catch can return